我开始用node.js、express和MongoDB规划一个REST API。该API为一个网站(公共和私人区域)提供数据,之后可能还会为一个移动应用程序提供数据。前端将使用AngularJS开发。
几天来,我读了很多关于保护REST API的文章,但我没有得到最终的解决方案。据我理解就是用HTTPS来提供一个基本的安全性。但如何在用例中保护API:
>
仅允许网站/应用程序的访问者/用户获取网站/应用程序的公共区域的数据
仅允许经过身份验证和授权的用户获取私有区域的数据(并且仅允许用户授予权限的数据)
目前,我考虑只允许具有活动会话的用户使用API。为了授权用户,我将使用passport,为了获得许可,我需要为自己实现一些东西。都在HTTPS上面。
有人能提供一些最佳实践或经验吗?我的“架构”有欠缺吗?
我也遇到过你描述的问题。我正在建立的网站可以从移动电话和浏览器访问,所以我需要一个api允许用户注册,登录和做一些特定的任务。此外,我需要支持可伸缩性,在不同的进程/机器上运行相同的代码。
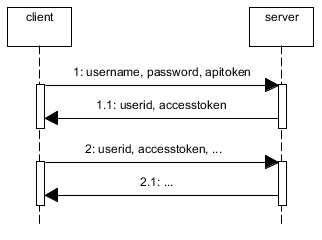
因为用户可以创建资源(也就是post/put操作),所以您需要保护您的API。您可以使用oauth,也可以构建自己的解决方案,但请记住,如果密码真的很容易发现,那么所有的解决方案都可能被破坏。其基本思想是使用用户名、密码和令牌(即apitoken)对用户进行身份验证。这个apitoken可以使用node-uuid生成,密码可以使用pbkdf2散列
然后,您需要将会话保存在某个地方。如果您将其保存在内存中的普通对象中,如果您关闭服务器并重新启动它,会话将被破坏。而且,这是不可扩展的。如果您使用haproxy在机器之间进行负载平衡,或者只是使用workers,则会话状态将存储在单个进程中,因此如果同一个用户被重定向到另一个进程/机器,则需要再次进行身份验证。因此,您需要将会话存储在一个公共位置。这通常是使用Redis完成的。
当用户通过身份验证(username+password+apitoken)时,为会话生成另一个令牌,也就是accessToken。再次使用node-uuid。向用户发送accesstoken和UserID。userid(键)和accesstoken(值)存储在redis中,使用和过期时间,例如1h。
现在,用户每次使用rest api执行任何操作时,都需要发送userid和accessToken。
如果允许用户使用rest api注册,则需要创建一个带有admin apitoken的admin帐户并将其存储在移动应用程序中(加密用户名+密码+apitoken),因为新用户注册时没有apitoken。
web也使用这个api,但您不需要使用ApitoKens。您可以将express与redis存储一起使用,或者使用上面描述的相同技术,但绕过apitoken检查,并将cookie中的userid+accessToken返回给用户。
如果您有专用区域,则在用户进行身份验证时将用户名与允许的用户进行比较。您还可以将角色应用于用户。
摘要:
没有apitoken的另一种选择是使用HTTPS,在授权头中发送用户名和密码,并在Redis中缓存用户名。
我想贡献这段代码作为所提出问题的结构解决方案,根据(我希望如此)被接受的答案。(您可以非常容易地自定义它)。
// ------------------------------------------------------
// server.js

// .......................................................
// requires
var fs = require('fs');
var express = require('express');
var myBusinessLogic = require('../businessLogic/businessLogic.js');

// .......................................................
// security options

/*
1. Generate a self-signed certificate-key pair
openssl req -newkey rsa:2048 -new -nodes -x509 -days 3650 -keyout key.pem -out certificate.pem

2. Import them to a keystore (some programs use a keystore)
keytool -importcert -file certificate.pem -keystore my.keystore
*/

var securityOptions = {
    key: fs.readFileSync('key.pem'),
    cert: fs.readFileSync('certificate.pem'),
    requestCert: true
};

// .......................................................
// create the secure server (HTTPS)

var app = express();
var secureServer = require('https').createServer(securityOptions, app);

// ------------------------------------------------------
// helper functions for auth

// .............................................
// true if req == GET /login

function isGETLogin (req) {
    if (req.path != "/login") { return false; }
    if ( req.method != "GET" ) { return false; }
    return true;
} // ()

// .............................................
// your auth policy  here:
// true if req does have permissions
// (you may check here permissions and roles
//  allowed to access the REST action depending
//  on the URI being accessed)

function reqHasPermission (req) {
    // decode req.accessToken, extract
    // supposed fields there: userId:roleId:expiryTime
    // and check them

    // for the moment we do a very rigorous check
    if (req.headers.accessToken != "you-are-welcome") {
        return false;
    }
    return true;
} // ()

// ------------------------------------------------------
// install a function to transparently perform the auth check
// of incoming request, BEFORE they are actually invoked

app.use (function(req, res, next) {
    if (! isGETLogin (req) ) {
        if (! reqHasPermission (req) ){
            res.writeHead(401);  // unauthorized
            res.end();
            return; // don't call next()
        }
    } else {
        console.log (" * is a login request ");
    }
    next(); // continue processing the request
});

// ------------------------------------------------------
// copy everything in the req body to req.body

app.use (function(req, res, next) {
    var data='';
    req.setEncoding('utf8');
    req.on('data', function(chunk) {
       data += chunk;
    });
    req.on('end', function() {
        req.body = data;
        next();
    });
});

// ------------------------------------------------------
// REST requests
// ------------------------------------------------------

// .......................................................
// authenticating method
// GET /login?user=xxx&password=yyy

app.get('/login', function(req, res){
    var user = req.query.user;
    var password = req.query.password;

    // rigorous auth check of user-passwrod
    if (user != "foobar" || password != "1234") {
        res.writeHead(403);  // forbidden
    } else {
        // OK: create an access token with fields user, role and expiry time, hash it
        // and put it on a response header field
        res.setHeader ('accessToken', "you-are-welcome");
        res.writeHead(200);
    }
    res.end();
});

// .......................................................
// "regular" methods (just an example)
// newBook()
// PUT /book

app.put('/book', function (req,res){
    var bookData = JSON.parse (req.body);

    myBusinessLogic.newBook(bookData, function (err) {
        if (err) {
            res.writeHead(409);
            res.end();
            return;
        }
        // no error:
        res.writeHead(200);
        res.end();
    });
});

// .......................................................
// "main()"

secureServer.listen (8081);
可以使用curl测试此服务器:
echo "----   first: do login "
curl -v "https://localhost:8081/login?user=foobar&password=1234" --cacert certificate.pem

# now, in a real case, you should copy the accessToken received before, in the following request

echo "----  new book"
curl -X POST  -d '{"id": "12341324", "author": "Herman Melville", "title": "Moby-Dick"}' "https://localhost:8081/book" --cacert certificate.pem --header "accessToken: you-are-welcome"
我刚刚完成了一个示例应用程序,它以一种非常基本但清晰的方式完成了这一操作。它使用mongoose和mongodb存储用户和用于身份验证管理的passport。
https://github.com/khelldar/angular-express-train-seed